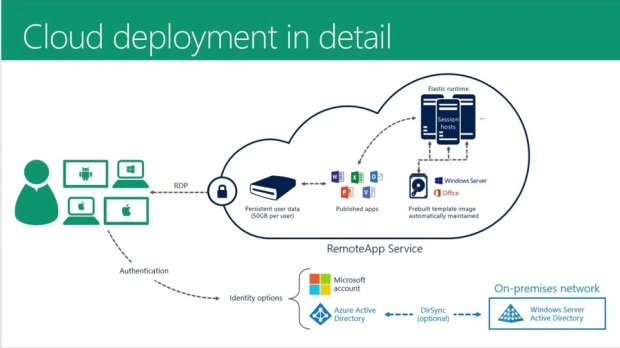
Microsoft Azure offers two ways to create and deploy a cloud service viz. Quick Create and Custom Create. The Quick Create approach or method is quite handy in that it makes available ready links for achieving all requirements in one go. In contrast, the Custom Create method is the right choice when the cloud service is ready for deployment right when it is being created.
Deploying an application on Azure: Software-as-a-Service (SaaS) model
The following elements are needed to deploy an application on Azure as SaaS:
- Service Definition
The service definition file specifies the service model plus quantifies the roles being created.
- Service Configuration
The service configuration file provides the settings for the cloud service and discrete roles plus quantifies the role instances.
- Service Package
The service package consists of the application code and configurations along with the service definition file. Service package must be created for creating a cloud service with deployment of web/worker roles.
How to prepare the app before deploying on Azure cloud?
Before deploying a cloud service, the cloud service package must be created from the application code and a cloud service configuration file. The Azure software development kit (SDK) provisions tools for readying the deployment files. The SDK can be installed in the language preferred for developing the application code.
The following cloud service features need specific configurations prior to exporting a service package:
Secure Sockets Layer (SSL) configuration would be required for cloud services that use SSL for data encryption.
Remote Desktop would need to be configured in case remote connections are required for individual role instances.
Azure Diagnostics would need to be enabled in case verbose monitoring is needed for the cloud service.
The default monitoring utilizes the performance counters taken from the host OS for role instances. In contrast, verbose monitoring takes additional values on basis of the performance data within the role instances for deeper analysis of issues that arise while application processing.
Prerequisites for deploying a cloud service on Azure
- Azure SDK installation
Click Install Azure SDK to visit the Azure Downloads page, and then download the SDK in the preferred language for writing the code.
- Creation of certificates
Create certificates for any role instances that may need one. Cloud services need a .pfx file with a private key. Upload the certificates to Azure as the cloud service is being created and deployed.
- Create the affinity group
Create the affinity group in case the cloud service is being deployed to an affinity group. The affinity group can be created in the Networks area of the Azure classic portal.
Create a cloud service and upload the deployment package
- Sign in to the Azure portal.
- Click New > Compute, go down and click Cloud Service.
- Click Create on the information page.
- Enter DNS name in the new Cloud Service
- Create a new Resource Group.
- Select a Location.
- Select Package, and fill in the required details.
- Select ‘Deploy even if one or more roles contain a single instance’ in case any of the roles consist of a single instance.
- Ensure that ‘Start deployment’ is selected.
- Click OK.
Once the steps are completed, verify that the deployment completed successfully by checking the cloud service instance (should display ‘Running’). As the final step, click the Site URL to open the cloud service in a web browser.